Let's take a closer look at what SetPoint can do with the G9 gaming mouse. The new SetPoint version 5 is specially designed for the G9 itself. If you install this particular version of SetPoint, it will not override the previous SetPoint application (if you have any). On your system tray, it will show 2 separate SetPoint icons.
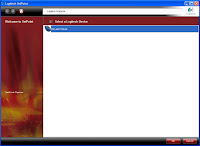
This will be the main screen that you see when you launch the software. Notice the completely different interface compared to the normal SetPoint.
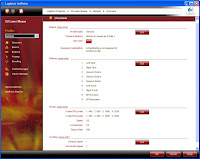
The overview window shows you, well.... the overview of your mouse settings.
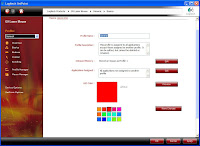
This is where you can edit profile names and descriptions. With SetPoint software installed, you can program additional 2 profiles into the onboard memory of the mouse. In General profile, you are not able to assign any specific application to work with it nor delete it from the mouse. It is meant to be the standard profile used throughout all applications.
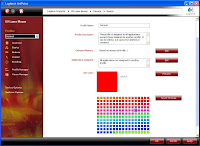
How about personalizing the LED color display of your G9? You get to choose from the list your preferred color! Too bad white and yellow are not available colors to select from because of the design constraints of the LED.
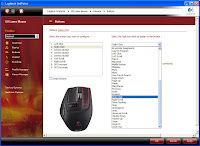
Behold! Now you can even program your right mouse button to other functions! Left mouse button remains unconfigurable. And yeah, you can program different profile for different button assignments. If you want to assign a macro to a button, you must first create and save the macro using the Macro Manager. Then select Macro from the task list on the right, and choose the specific macro you want to use.
Note: Some tasks will not function unless SetPoint is running. The task description will indicate if SetPoint is required. Also, the behavior of some tasks will vary depending on the application you are using. Not all tasks may be supported by your application. For example, SetPoint sends a “Ctrl+Wheel Forward” command to zoom in. Many applications support this command, but a few use other commands to zoom in, such as Ctrl++. If the default command for a particular task is not supported by your application, you can select “Keystroke Assignment” from the task list and create customized commands.
Note: If you swap the left and right click functions on the two main mouse buttons, this setting will be enabled on all profiles. The right mouse button must be assigned to Right Click when swapping functions or you will not be able to select an object. If you do assign the right button to a function other than Right Click and then swap buttons, you will need to switch to another profile so you can select objects, then undo the swap button setting in profile that was changed.
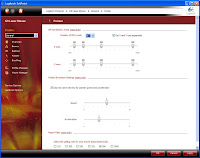
 Anyone who used G5 or G7 will be familiar with this screen. By default, the "general" profile has 4 DPI settings. You can adjust how many pixels the pointer moves across the screen for each inch you move the mouse. This correlates to how fast the pointer moves across the screen. The higher the DPI level, the faster the pointer will move.
The + and - buttons allow you to quickly adjust the DPI to match the application you are using. For example, in applications where speed is most important, like making fast turns, you will want to select a higher DPI level. In other applications where precision matters most, such as zeroing in on a target, you will want to select a lower DPI level.
DPI sensitivity is also useful to match mouse behavior to your monitor size. If you have a large, high-resolution monitor you will usually want a higher DPI setting. This will minimize the distance you need to move the mouse in order to move the cursor across the screen. Conversely, smaller, low-resolution screens require a lower DPI setting since you don’t need to move the mouse as far to traverse the screen.
The G9 Laser Mouse supports up to five DPI levels for each axis. If SetPoint is running the levels can be set independently for each axis by clicking the checkbox. If the checkbox is unchecked, or when SetPoint is not running, the same levels apply to both axis.
To switch between levels, click the + and - buttons on the mouse. The number of levels can change in each profile, however you must have a minimum of one level in each profile
Pointer Speed and Pointer Acceleration settings work on top of the DPI level to further adjust how the pointer behaves. Pointer Speed allows you to increase or decrease the pointer speed from the baseline determined by the DPI level. Pointer Acceleration allows you to control how fast the pointer moves relative to the speed with which you move the mouse. As you move the mouse faster, the cursor moves at progressively faster rates with high acceleration settings. Choose a higher setting for more responsiveness, or a lower setting for more accuracy. Some gamers prefer to set acceleration to zero for a direct 1:1 correlation between the speed you move the mouse and the speed the cursor moves. Note: If you adjust the speed or acceleration settings in a profile other than the one which is active, the new settings will not be active until you switch to the profile that was modified. If Automatic Profile Switching is enabled, you must be using an application that is assigned to the modified profile.
From the report rate, you can select how many times per second the mouse reports its position to the computer’s operating system. Higher settings provide smoother, more responsive pointer movement, but also consume more CPU bandwidth. Standard mice generate 125 reports/second, but the G9 Laser Mouse supports full-speed USB, allowing up to 1000 reports/second. For serious gaming applications Logitech recommends 500 reports/second as a good balance between pointer responsiveness and CPU utilization.
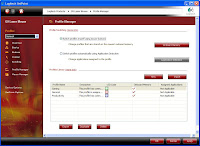
You can switch profiles manually using buttons on the mouse, or have SetPoint switch profiles automatically on an application-specific basis. When Manual Profile Switching is selected, you can switch between profiles stored in the G9 Laser Mouse’s onboard memory. The LEDs on the mouse will indicate which profile is selected by glowing the color assigned to the profile. The profile will remain active until switched. To switch profiles manually, press and hold the Profile button on the bottom of the mouse until the Running Man LED on top of the mouse begins to blink, use the + and – buttons to toggle between profiles on the mouse’s memory. When you have selected the desired profile, release the Profile button. The LED will stop blinking and glow the color assigned to the profile.

When Automatic Profile Switching is selected, profiles will switch automatically when the specified application(s) are detected. The following rules apply to Automatic Profile Switching: - One or more applications can be assigned to a single profile. - Once an application is assigned to a profile it cannot be assigned to another profile. - When using an application that is not assigned to any profile, the General profile will be active. - Profiles can be on the mouse’s memory or in the SetPoint Profile Library. - Up to 30 profiles can be in SetPoint, and an unlimited number can be on your hard drive or other storage device. Note: If no applications are assigned to a profile, that profile can only be activated by storing the profile in the mouse’s onboard memory and using manual profile switching to select the profile.
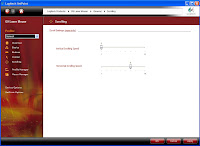
Vertical Scrolling Speed adjusts how fast you scroll up or down when you spin the wheel. Horizontal Scrolling Speed adjusts how fast you scroll side-to-side when you tilt the wheel (provided Left Scroll and Right Scroll are assigned to the tilt wheel). Choose a higher number for faster scrolling; a lower number for slower scrolling.
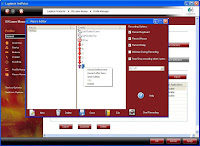
Finally, a mouse which can actually execute not just shortcuts, but Macros! The screen above shows that you can perform the same macro recording and execution like what you can do on the G15 keyboard. The only difference is that with SetPoint and G9, you can even record mouse clicks! The only drawback is no repeating feature on the macros.
 There are three default profiles included in SetPoint – General, Gaming and Productivity . If you have changed the profile settings and want to restore the original profiles, click the Restore
 button. Profiles with a checkmark next to them will be restored.
Note: - Any changes you have made to the default profiles will be lost. - If you are using manual profile switching, profiles stored in the mouse's onboard memory will not be updated until you switch to the profile. - If you are using automatic profile switching, the restored profiles will be active when you use an application assigned to one of the profiles.

You can check for updates, or enable the auto-update feature to ensure you always have the latest software.


